Spring Security Filter
스프링 시큐리티에서 기본적으로 제공하는 15개의 필터에 대해서 알아보려 한다.
아래와 같은 순서로 15개의 필터가 구성되어 있다.
WebAsyncManagerIntegrationFilter
SpringMVC Async Hanlder 를 지원하기 위한 필터다.
SecurityContextHolder 는 thread local 을 사용하기 때문에 aysnc 한 핸들러(컨트롤러) 를 사용할 경우 같인 thread 를 사용하지 않아도 SecurityContext 를 공유할 수 있게 도와주는 필터이다.
역할을 아래와 같이 정리할 수 있다.
preprocessing 과정에서 새로만든 thread 에 SecurityContext를 공유하는 작업이 일어난다.
postprocessing 과정에서 SecurityContext 를 비워주는 작업이 일어난다.
아래와 같은 테스트해볼 수 있다.
public class SecurityLogger {

    public static void log(String message){
        System.out.println(message);
        Thread thread = Thread.currentThread();
        System.out.println("Thread : " + thread.getName());
        Object principal = SecurityContextHolder.getContext().getAuthentication().getPrincipal();
        System.out.println("Principal : " + principal);
        System.out.println("===================");
    }
}
위와 같이 현재의 thread 와 principal 정보를 보여주는 역할을 하는 클래스를 정의했다.
아래와 같이 2가지 경우로 나눠서 테스트 해볼 수 있다.
  @GetMapping("/async-handler")
  @ResponseBody
  public Callable<String> aysncHanlder(){
      SecurityLogger.log("MVC"); //thread 1
      return new Callable<String>() {
          @Override
          public String call() throws Exception {
              SecurityLogger.log("Callable"); //thread 2
              return "Aysnc Handler";
          }
      };
  }
- 로그 결과를 보면 thread1, thread2 가 다른 스레드인 것을 확인할 수 있다.
- 하지만 둘 모두 같은 Principal 가 같다. -> WebAsyncManagerIntegrationFilter 덕분이다.
aysnc 한 service 일 경우 (@EnableAsync 를 설정 클래스에 추가해 줘야한다.)
  @GetMapping("/async-service")
  @ResponseBody
  public String asyncService(){
      SecurityLogger.log("MVC, before async service"); //thread1
      sampleSerivce.asyncService();
      SecurityLogger.log("MVC, after async service");
      return "Async Service";
  }
@Async
public void asyncService() {
SecurityLogger.log("Async Service"); //thread2
System.out.println("Async Service is called");
}
위의 경우 처럼 service 가 async 할 경우에는 SecurityContext를 공유할 수 있을까?
공유하지 못해서 Principal 값이 다르다. -> 공유하기 위해서 아래와 같은 설정을 추가해 줘야한다.
@Override
protected void configure(HttpSecurity http) throws Exception {
    http.addFilterBefore(new LoggingFilter(), WebAsyncManagerIntegrationFilter.class);

    http.authorizeRequests()
            .requestMatchers(PathRequest.toStaticResources().atCommonLocations()).permitAll()
            .mvcMatchers("/", "/info", "/account/**", "/signup").permitAll()
            .mvcMatchers("/admin").hasRole("ADMIN")
            .mvcMatchers("/user").hasRole("USER")
            .anyRequest().authenticated()
            .expressionHandler(expressionHandler());

    SecurityContextHolder.setStrategyName(SecurityContextHolder.MODE_INHERITABLETHREADLOCAL);
}
위와 같이 SecurityContextHolder.setStrategyName(SecurityContextHolder.MODE_INHERITABLETHREADLOCAL); 를 설정해주면 같은 Principal 값을 확인할 수 있다.
MODE_INHERITABLETHREADLOCAL 인 이유는 thread1 인 nio 안에서 만들어진 하위 스레드 이기 때문이다.
SecurityContextPersistenceFilter
15개의 필터 중에서 2번째에 위치하는 필터다.
SecurityContextRepository 를 사용해서 기존의 SecurityContext 가 있다면 읽어오고, 없다면 비어있는 SecurityContext를 만든다.
SecurityContext 는 Http Session 에서 읽어 온다.
Spring-Session 과 연동하여 세션 클러스터를 구현할 수 있다.
이 필터는 인증을 처리하기 전에 거치는 것이 맞다. -> 이미 인증된 SecurityContext 를 다시한번 인증 하기위해 다른 필터들을 거칠 필요는 없기 때문이다. -> 그렇기 때문에 2번째에 위치한 것이다.
그렇기 때문에 커스텀한 인증 필터를 만들고 싶다면 이 필터 뒤에 위치시켜야 한다.
정리하면 아래와 같다.
익명사용자의 경우
새로운 SecurityContext 객체를 생성하여 SecurityContextHolder 에 저장한다.
AnonymousAuthenticationFilter 에서 AnonymousAuthenticationToken 객체를 SecurityContext 에 저장한디.
인증 시점
새로운 SecurityContext 객체를 생성하여 SecurityContextHolder 에 저장한다.
UsernamePasswordAuthenticationFilter 에서 인증 성공 후 SecurityContext 에 UsernamePasswordAuthentication 객체를 SecurityContext 에 저장한다.
인증이 최종 완료되면 Session 에 SecurityContext 를 저장한다.
인증 후
Session 에서 SecurityContext 꺼내어 SecurityContextHolder 에서 저장한다.
SecurityContext 안에 Authentication 객체가 존재하면 계속 인증을 유지한다.
최종 응답이 완료된 후
SecurityContextHolder.clearContext()
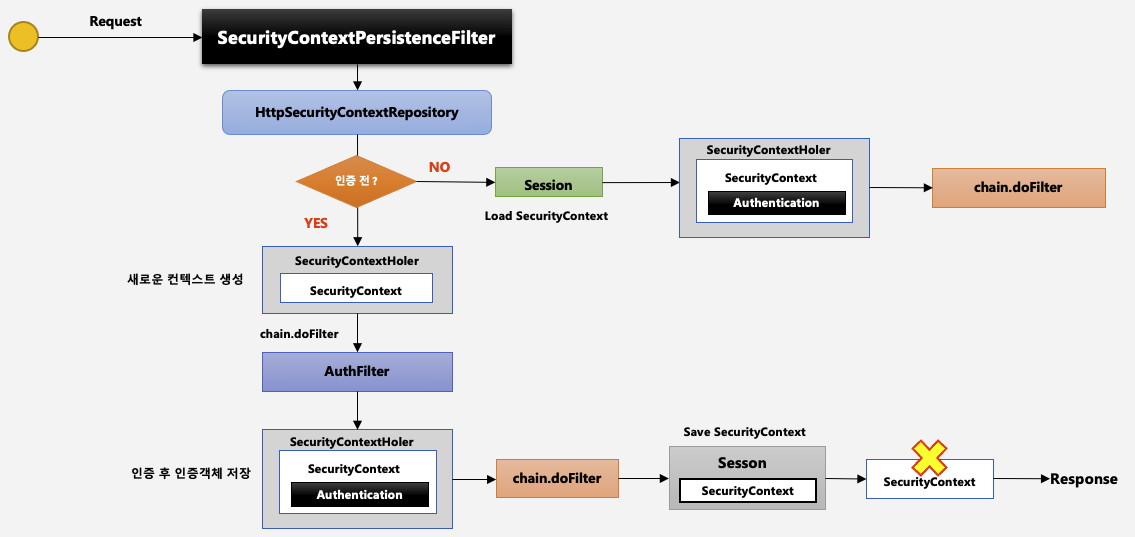
SecurityContextPersistenceFilter 의 처리흐름은 아래와 같다.
위의 사진처럼 인증 된 사용자와 인증 되지 않은 사용자의 로직이 다른것을 확인할 수 있다.
왼쪽의 SecurityContextHolder 가 인증전이고 오른쪽의 SecurityContextHolder 가 인증 후이다.
인증 전일 경우 Authentication 객체가 null 인 것을 확인 할 수 있다.
HeaderWriterFilter
15개의 필터 중에서 3번째에 위치하는 필터이다.
응답 헤더에 시큐리티 관련 헤더를 추가해주는 필터다.
XContentTypeOptionsHeaderWriter: 마임 타입 스니핑 방어.
X-Content-Type-Options: nosniff
XXssProtectionHeaderWriter: 브라우저에 내장된 XSS 필터 적용.
X-XSS-Protection: 1; mode=block
CacheControlHeadersWriter: 캐시 히스토리 취약점 방어.
Cache-Control: no-cache, no-store, max-age=0, must-revalidate
HstsHeaderWriter: HTTPS로만 소통하도록 강제.
XFrameOptionsHeaderWriter: clickjacking 방어.
위와 같이 설정되어 있기때문에 헤더에는 아래와 같이 표시된다.
Cache-Control: no-cache, no-store, max-age=0, must-revalidate
Content-Language: en-US
Content-Type: text/html;charset=UTF-8
Date: Sun, 04 Aug 2019 16:25:10 GMT
Expires: 0
Pragma: no-cache
Transfer-Encoding: chunked
X-Content-Type-Options: nosniff
X-Frame-Options: DENY
X-XSS-Protection: 1; mode=block
CsrfFilter
CSRF 는 인증된 유저의 계정을 사용해 악의적인 변경 요청을 만들어 보내는 기법을 말한다.
CORS를 사용할 때 특히 주의 해야 한다. -> 타 도메인에서 보내오는 요청을 허용하기 때문이다.
csrfFilter 는 모든 요청에 랜덤하게 생성된 토큰을 HTTP 파라미터로 요구한다.
요청 시 전달되는 토큰 값과 서버에 저장된 실제 값과 비교한 후 만약 일치하지 않으면 요청은 실패하게 된다.
하지만 폼기반의 애플리케이션이 아니고, rest api 인 경우는 http.csrf().disable(); 로 설정해서 이 필터를 거치지 않게 하는게 낫다. -> 요청을 보낼 때마다 CSRF 토큰을 보내줘야하기 때문이다.
폼 전송일 경우에는 무조건 하는게 좋다.
LogoutFilter
여러 LogoutHandler를 사용하여 로그아웃시 필요한 처리를 하며 이후에는 LogoutSuccessHandler를 사용하여 로그아웃 후처리를 한다.
LogoutFilter 는 크게 LogoutHandler 와 LogoutSuccessHandler 로 나뉘어진다.
LogoutHandler 여라가지 핸들러를 가지고있는 Composite 객체이다.
LogoutHandler
CsrfLogoutHandler
SecurityContextLogoutHandler
LogoutSuccessHandler -> LogoutSuccessHandler 는 로그아웃이 성공했을 때의 처리를 컨트롤 한다.
SimplUrlLogoutSuccessHandler
아래와 같이 로그아웃 필터를 설정할 수 있다.
http.logout()
        .logoutUrl("/logout") // 로그아웃 url 설정 -> 커스텀 하려면 바꿀 수 있다.
        .logoutSuccessUrl("/") // 로그아웃되면 루트 페이지로 보내겠다.
        .logoutRequestMatcher()
        .invalidateHttpSession(true) // 로그아웃한다음 세션을 invalid 처리할 것이냐
        .deleteCookies("") // 해당 쿠키 삭제
        .addLogoutHandler() // 핸들러를 추가해서 부가적인 작업을 할 수 있다.
        .logoutSuccessHandler(); // 로그아웃이 성공적으로 이뤄진다음에 부가적인 작업을 하고싶을때 사용할 수 있다.
UsernamePasswordAuthenticationFilter
폼에서 아이디 비밀번호를 눌렀을때 처리되는 필터이다.
AuthenticationManager 를 이용해서 Authenticate(안증) 를 처리한다.
AuthenticationManager 는 구현체인 ProviderManager 를 사용하는데, ProviderManager는 여러개의 AuthenticationProvider 를 사용한다. -> AuthenticationProvider 중 DaoAuthenticationProvider 는 UserDetailsService 를 사용한다.
UserDetails 정보를 가져와 사용자가 입력한 password 와 비교한다.
DefaultLogin/LogoutPageGeneratingFilter
기본 로그인 폼 페이지를 생성해주는 필터다.
/login 요청을 처리하는 필터다.
http.formLogin()
      .usernameParameter("my-username")
      .passwordParameter("my-password");
위와 같이 폼으로 넘어오는 변수값을 바꿔줄 수 있다.
http.formLogin()
      .loginPage("/signin);
이렇게 설정하면 DefaultLoginPageGeneratingFilter,DefaultLogoutPageGeneratingFilter 가 등록되지 않는다.
위와 같이 설정된 순간 커스텀한 로그인, 로그아웃 페이지를 쓴다고 가정하고, 위의 두 필터를 제공하지 않는다.
그렇다면 커스텀한 로그인 페이지를 아래와 같이 만들 수 있다.
BasicAuthenticationFilter
요청 헤더에 username와 password를 실어 보내면 브라우저 또는 서버가 그 값을 읽어서 인증하는 방식을 처리한다.
보통 브라우저 기반 요청이 클라이언트의 요청을 처리할 때 자주 사용한다.
보안에 취약하기 때문에 반드시 HTTPS를 사용할 것을 권장한다. -> 예를들어 스니핑을 당할 수 있기 때문이다.
UsernamePasswordAuthenticationFilter 와 비슷하지만, UsernamePasswordAuthenticationFilter 는 폼에서 읽어온다.-> 이 경우는 정보가 Security Context 에 저장되고, 그값을 SecurityContextPersistenceFilter 가 가져오므로 stateful하다. -> 폼인증인 경우 이렇게 하는게 바람직하다.
하지만, BasicAuthenticationFilter 는 헤더에서 읽어온다. -> Security Context 에 저장되는 로직이 없다. -> stateless하다. -> 그렇기 때문에 매 요청시 헤더에 보내줘야한다. -> 폼인증이 아닌경우 이렇게 쓰는게 바람직하다.
RequestCacheAwareFilter
현재 요청과 관련 있는 캐시된 요청이 있는지 찾아서 적용하는 필터이다.
만약 어떤 페이지에 접근하면 accessDecisionManager 접근가능한지 체크한다. -> 접근이 불가능하다면, 로그인페이지(다른페이지로 설정할 수 있다.) 로 가는게 맞다고 판단한다. -> 캐시에 원래 요청을 저장해두고 -> 로그인 페이지로 이동한다. -> 로그인 처리가 끝난 후 캐시에 저장해둔 원래 요청을 처리한다.
정리하면 아래와 같다.
캐시된 요청이 없다면, 현재 요청 처리한다.
캐시된 요청이 있다면, 해당 캐시된 요청 처리한다.
SecurityContextHolderAwareRequestFilter
시큐리티 관련 서블릿 API를 구현해주는 필터이다
아래와 같은 메서드를 구현한다.
HttpServletRequest#authenticate(HttpServletResponse)
HttpServletRequest#login(String, String)
HttpServletRequest#logout()
AsyncContext#start(Runnable)
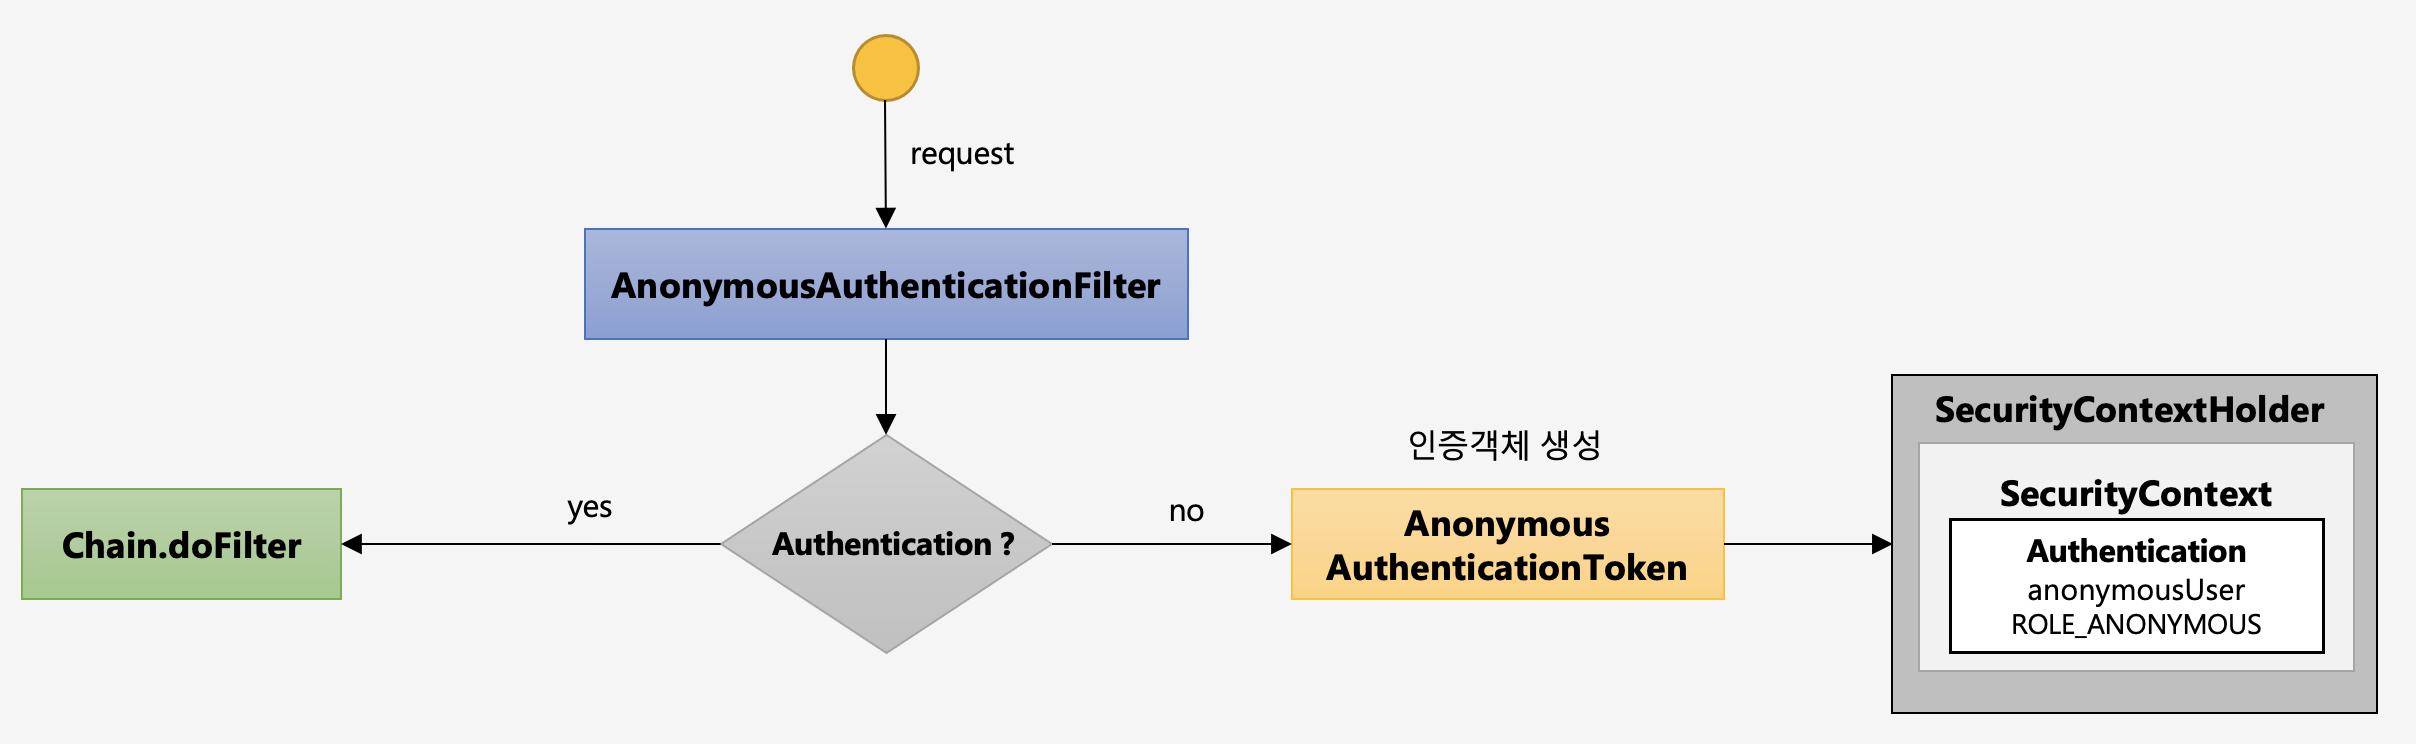
AnonymousAuthenticationFilter
익명사용자에 대한 인증 필터이다.
익명사용자와 인증 사용자를 구분해서 처리하기 위한 용도로 사용된다.
인증이 안된 사용자를 익명 Authentication 객체를 만들어서 security context holder 에 넣어주는 역할을 한다.
화면에서 인증 여부를 구현할 때 isAnonymous() 와 isAuthenticated() 로 구분해서 사용한다.
인증객체를 세션에 저장하지 않는다.
현재 SecurityContext에 Authentication이 null이면 “익명 Authentication”을 만들어 넣어주고, null이 아니면 아무일도 하지 않는다.
아래와 같이 기본으로 만들어 사용할 “익명 Authentication” 객체를 설정할 수 있다.
http.anonymous()
        .principal()
        .authorities()
        .key()
SessionManagementFilter
세션을 관리해주는 필터이다.
아래와 같이 세션 전략을 설정할 수 있다.
http.sessionManagement()
        .sessionFixation()
        .changeSessionId();

http.sessionManagement()
        .sessionFixation()
        .migrateSession();
migrateSession() 의 경우, 인증이 됐을 때 새로운 세션을 만들고, 기존 세션의 정보를 복사해온다.
changeSessionId() 의 경우, 세션 ID 만 바꾸기 때문에 migrateSession 보다 빠르다.
http.sessionManagement()
        .sessionFixation()
        .invalidSessionUrl("/login");
위와 같이 유효하지 않은 세션을 리다이렉트 시킬 URL 설정할 수 있다.
http.sessionManagement()
        .sessionFixation()
        .maximumSessions(1)
        .maxSessionsPreventsLogin(true);
maximumSessions(1) 를 1로 설정함으로써 동시 로그인 유저 수를 1명으로 제한 할 수 있다.
maxSessionsPreventsLogin 는 추가 로그인을 막을지 여부 설정
default 값은 false 이다. -> 기존 로그인 세션을 만료 시키고 새로운 로그인 인증만 사용한다.
maxSessionsPreventsLogin(true); -> 존 로그인 세션만 유지하고, 새로운 로그인 세션을 막아준다.
세션의 생성 전략은 아래와 같다.
IF_REQUIRED -> 기본값이다. -> 필요하면 만든다.
NEVER -> 시큐리티에서는 생성 X, 기존의 세션을 활용한다.
STATELESS -> 세션을 사용하지 않는다. -> stateless 방식이기 때문에 폼인증에는 저정하지 않는다.
ALWAYS -> 세션을 항상 사용한다.
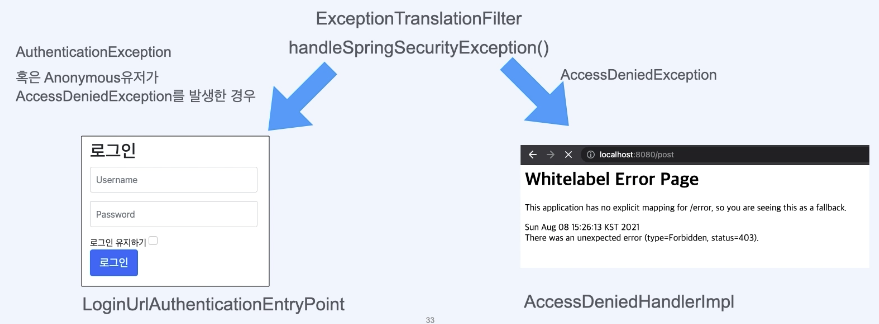
ExceptionTranslationFilter
FilterSecurityInterceptor 와 밀접한 관계가 있다.
ExceptionTranslationFilter 가 FilterSecurityInterceptor 보다 이전에 있어야 한다. -> 그래서 14번째에 위치하는 것이다.
ExceptionTranslationFilter 가 FilterSecurityInterceptor 를 감싸고 실행되어야 한다.
Authentication 에러 발생시 -> AuthenticationEntryPoint 를 활용해서 처리한다. -> 로그인 페이지로 이동시킨다.
AccessDeniedException 에러 발생시 -> AccessDeniedHandler를 활용해서 처리한다. -> 403 Error 로 처리한다.
아래와 같이 에러를 로깅함으로써 백엔드 사이드에 확실하게 에러를 전달할 수 있다.
당연히 Exception에 대한 처리 방식은 변경할 수 있다.
http.exceptionHandling()
  .accessDeniedHandler((request, response, accessDeniedException) -> {
    UserDetails principal = (UserDetails) SecurityContextHolder.getContext().getAuthentication().getPrincipal();
    String username = principal.getUsername();
    System.out.println(username = " 이 " + request.getRequestURI()+ "에 접근하려다 실패했습니다.");
    response.sendRedirect("/access-denied");
  })
security context 에서 principal 정보를 가져와서 로그를 남긴다.
/access-denied 페이지로 이동시킨다.
FilterSecurityInterceptor
15개중 가장 마지막에 위치한 필터로써, 인증된 사용자에 대하여 특정 요청의 승인/거부 여부를 최종적으로 결정한다.
인증객체 없이 보호자원에 접근을 시도할 경우 AuthenticationException 을 발생한다.
인증 후 자원에 접근 가능한 권한이 존재하지 않을 경우 AccessDeniedException 을 발생한다.
HTTP 리소스 시큐리티 처리를 담당하는 필터이다.
권한 처리를 AccessDecisionManager에게 맡기고, AccessDecisionManager를 사용하여 인가를 처리한다.
인증이 된 상태에서 특정 리소스에 접근할 수 있는지 Role을 확인한다.
다시말해서, AccessDecisionManager를 사용해서 Access Control 또는 예외 처리하는 필터다.
아래와 같이 설정할 수 있다.
http.authorizeRequests()
                .mvcMatchers("/", "/info", "/account/**", "/signup").permitAll()
                .mvcMatchers("/admin").hasRole("ADMIN")
                .mvcMatchers("/user").hasRole("USER")
                .anyRequest().authenticated()
                .expressionHandler(expressionHandler());
REFERENCES
백기선님의 스프링 시큐리티
정수원님의 스프링 시큐리티
안성훈님의 스프링 시큐리티